Keeping your contacts straight is one of the most important aspects of owning a mobile device. When software problems arise, you may lose important contacts and other data. If you haven’t previously backed these contacts up, you may find yourself scrambling to track down friends and family. Thankfully, backing up your contacts is easy to do. In the following guide, we’ll outline how to sync contracts from your iPhone.
How to Sync Contacts From Your iPhone: Using iCloud
Smartphones are complicated, that’s no secret. However, many iPhone users will be pleased to know that the easiest way to keep your contacts safeguarded is largely a passive process. Thankfully, learning how to sync contacts from your iPhone is easy on iOS. Using iCloud, you can flick a toggle and blissfully forget while Apple handles the legwork.
Turning on iCloud sync for Contacts
- On your device, open Settings and tap on the banner containing your name at the top of the screen. Listed under your name will be “Apple ID, iCloud, iTunes & App Store.” This will take you into your Apple ID settings.
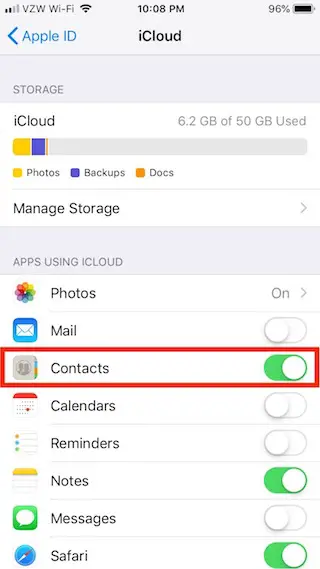
- Within the Apple ID page, locate iCloud in the list. It will be accompanied by a blue cloud icon to the left. Tap this to access your iCloud settings.
- Under the section titled “APPS USING ICLOUD,” locate Contacts amongst the list of toggles. Tap the toggle to activate syncing for your contacts. When the toggle is active, it will be colored green.
After completing these quick steps, iCloud will sync your contacts over the air, using either a Wi-Fi or cellular connection. Those with limited data plans should be mindful of this. However, Contacts typically does not eat through a lot of data.
Note: iCloud will automatically sync any changes you make to your contacts in an effort to keep your information up to date. For those attempting to conserve data or battery life, you can change your iCloud settings to only update at certain time intervals. If you wish to immediately upload any changes to iCloud, open either Phone or Contacts to your contacts list, and pull down from the top of the screen to manually refresh.
If you wish to manage your iCloud contacts later, you may do so by logging into iCloud.com on your desktop and using the Contacts app. Users with two-factor authentication enabled must have another Apple device nearby to confirm this login.
Syncing Using iTunes
While iCloud is certainly a convenient option, users may prefer to manage their data with iTunes. If you’re used to connecting with a trusty lightning to USB cable, you’re on the fast track to learning how to sync contacts from your iPhone:
- Using the cable included with your iPhone (or a third-party alternative), connect your device to your computer. Should iTunes not open automatically, launch the app.
- Depending on your iTunes settings, your phone may begin syncing with iTunes automatically. This is perfectly fine. Let iTunes finish the syncing process.
- Near the lefthand corner of the screen, you’ll see a button containing an iPhone icon. Click this button to enter the management page for your device.
- In the sidebar, click Info. Your phone’s Contacts sync settings are located here:
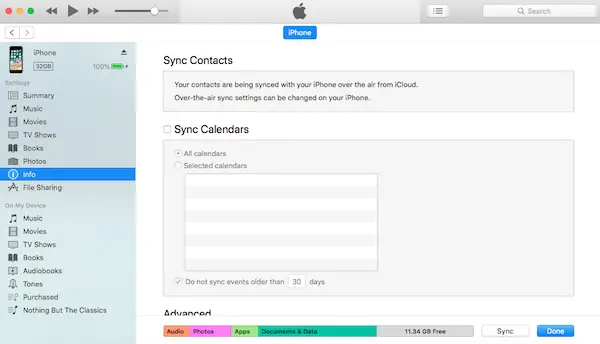
- If your contacts are already managed via iCloud, iTunes will not present a checkbox for Sync Contacts. If you don’t use iCloud, check the box to the left of Sync Contacts.
- To transfer your contacts, click the Sync button in the bottom right. iTunes will sync your contacts successfully.
Note: If you make any changes to your contacts on your desktop, iTunes will apply these changes to your device the next time it’s synced. If you make changes on your device, they will not be transferred over until you sync again via lightning cable.
There you have it! No matter which method you choose, rest assured that your important contacts will be both archived and updated.