If you are a habitual iTunes user, you may often use the iTunes Store to download music, videos, and other media. Additionally, your computer will have access to apps, audiobooks, books, and other content. If you are planning to make purchases using your Apple ID, you first need to authorize your computer. This grants your Mac or PC permission to view and sync these downloads to your Apple devices. In the following guide, we will outline how to authorize your computer for iTunes.
After completing these steps, you should have no problems accessing any of your iTunes content whenever you wish.
How to Authorize Your Computer for iTunes
Before we begin, keep in mind that you can only authorize a computer via iTunes on that computer. Authorizations cannot be done remotely. In addition, you can authorize up to 5 computers using your Apple ID. This allows you to play your content on these approved devices.
1. Open iTunes from the Dock, Finder, or LaunchPad
2. Make sure you are signed in with your Apple ID
Sign into your Apple ID by navigating to the Account tab in the top menu. iTunes will prompt you to enter your login information and confirm. Both Mac and PC share this same Account tab on the menu bar.
3. Authorize your computer
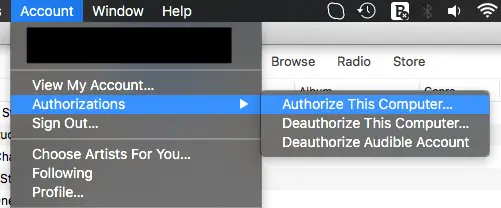
The steps for authorizing your computer are the same on both Mac and PC. Reveal the iTunes menu bar – you can do this on Windows by pressing [su_highlight background=”#f294a6″]Control + B[/su_highlight].
Hover over Account to summon the drop down menu. Navigate to Authorizations, and arrow over to Authorize This Computer. Select this option.
Next, iTunes will prompt you to enter your password. After doing so press either [su_highlight background=”#f294a6″]Return[/su_highlight] or [su_highlight background=”#f294a6″]Enter[/su_highlight] on your keyboard, or click the Authorize button. Your computer will then be authorized.
iTunes may ask you to authorize your computer again, in the event of a problem. If you choose to do this, another of your 5 authorizations will not be used. Now that you know how to authorize your computer for iTunes, you may follow these steps in the future as needed, should you replace your computer.
How to Check Your Authorization Count
If you want to view your number of used authorizations, you will need to visit your account summary. As always, make sure you are signed into iTunes using your Apple ID.
1. From the menu bar, navigate to Account > View My Account
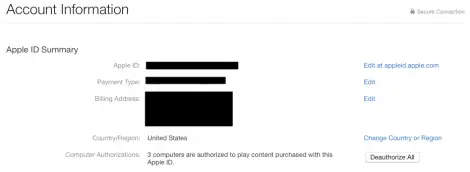
This will pull up an overview of your Apple ID, displaying key information associated with your account. The page will show the number of authorizations currently used next to “Computer Authorizations.” Keep in mind that you cannot view the names of these computers on this page.
Note: You will not see the Authorizations section if you have not authorized 2 or more computers.
If more computers are authorized than expected, you may need to deauthorize any previously-approved computers. These could be either retired or sold machines.
Thanks for reading! If you need to troubleshoot any further issues related to authorizations, please go here.